C++/CLI:使用 C++/CLI、FFmpeg 打造影片撥放功能
前言
最近因為工作需要在 C/C++ 環境底下開發出影片檔讀取並撥放功能,由於有跨平台測試的需求 (Windows/Linux),最直覺想到的就是使用 FFmpeg。Windows 會用 C++/CLI CLR 開發視窗畫面;Linux 則是靠 MiniGUI 顯示到 LCD 模組上,這篇文章主要是紀錄我如何在 Visual Studio 中完成 CLR WinForm 簡易撥放功能,其實呼叫 FFmpeg 相關程式是參考網路上文章,幾乎是複製貼上了,只是還是需要修改許多東西才能正常執行,像是記憶體溢出,或是畫面顏色處理的問題等等。
這邊我不打算整理 FFmpeg 的用法,因為我也沒很熟悉,網路上查就有一堆大神分享,但會簡單紀錄一下呼叫了哪些 API。如果以後使用到一定程度,我應該會直接寫另外一篇文章吧www。
事前工作
- 安裝 Visual Studio 2019
- 在 Visual Studio 中導入 CLR WinForm 專案開發
- 下載 FFmpeg 的 Library 函式庫
這邊我是去網路上找 win32 版本,官網上現在只提供 x64 版本,不過配置方式其實一樣。
專案配置
CLR 專案詳細設定可以參考先前文章,這邊不再贅述。 (註:對應下文第 1、2 點)
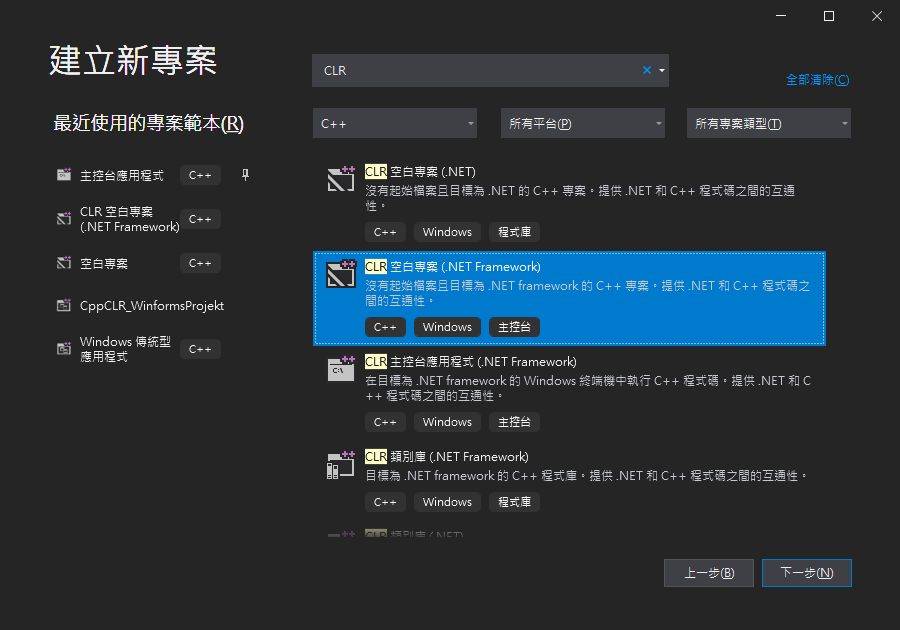
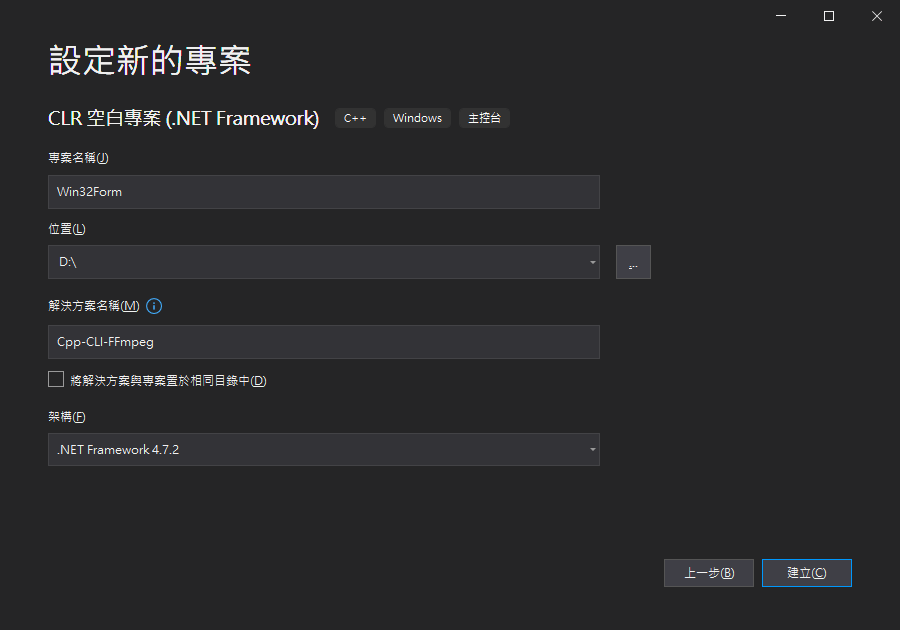
1. 新增 CLR 專案
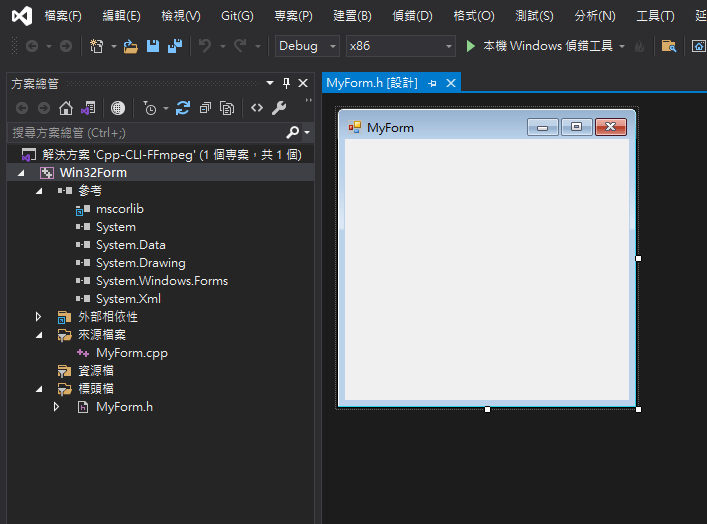
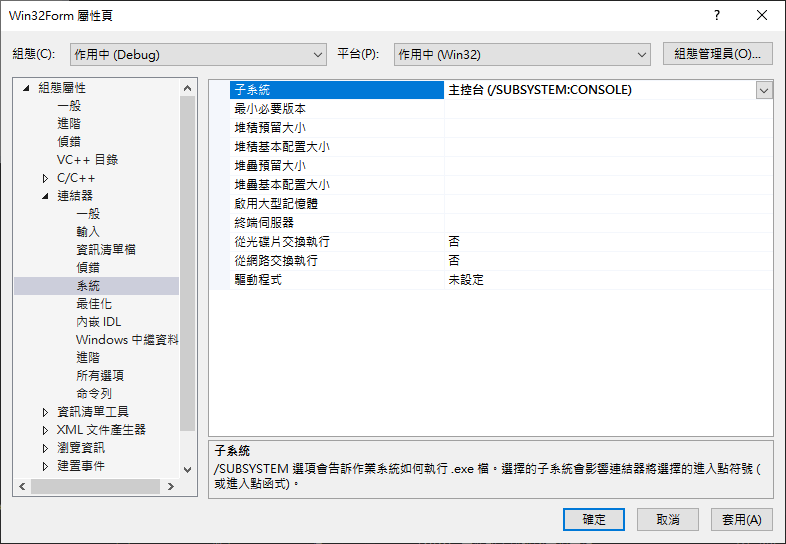
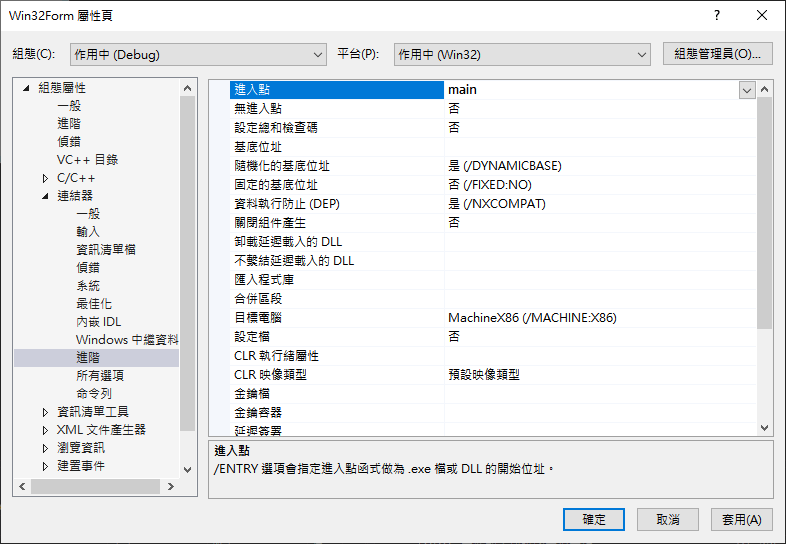
2. 新增 MyForm 檔案並進行屬性設定
3. 設定 FFmpeg
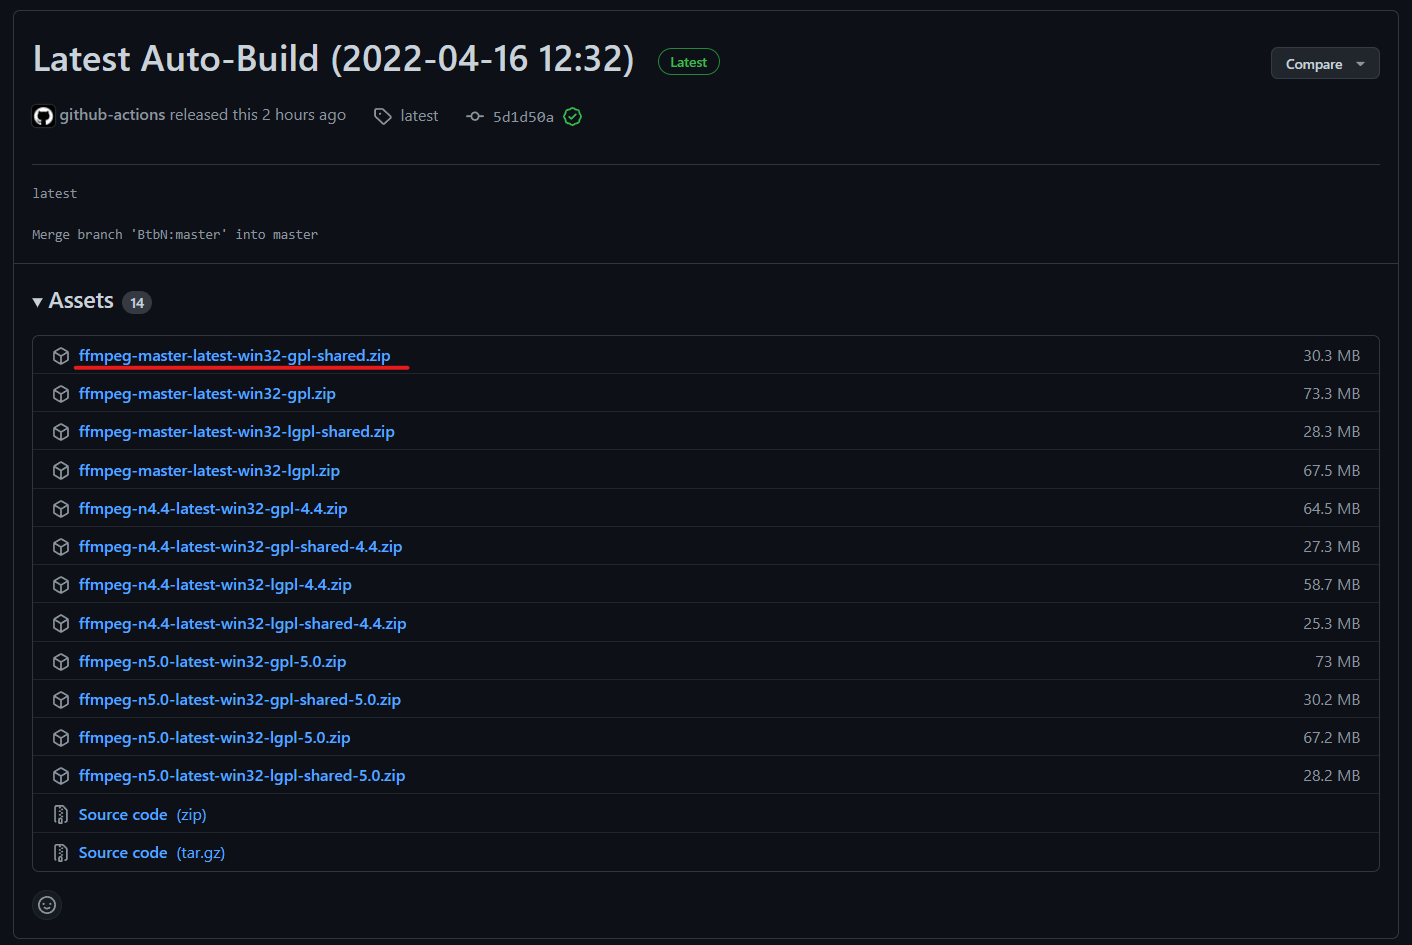
a. 下載 FFmpeg Windows Build
我是下載 x86 版本,檔名要找 ‘ffmpeg-master-latest-win32-shared.zip’。
(https://yang10001.yia.app/wp-content/uploads/2022/04/06.png)
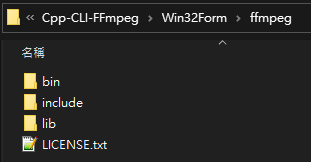
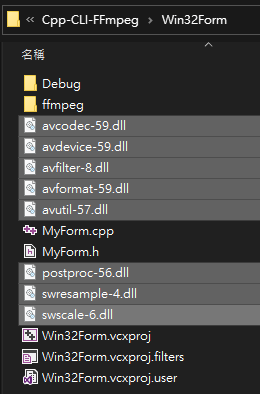
b. 解壓縮並重新命名成 ‘ffmpeg’ 放到 ‘Win32Form’ 專案資料夾中
解壓路徑跟所需要的檔案可以參考下圖,原本還有一個 ‘doc’ 資料夾,但我刪掉了XD
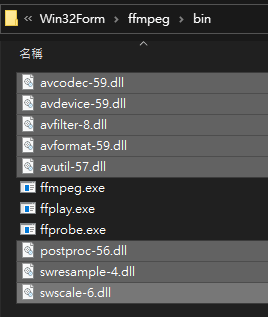
c. ‘bin’ 資料夾裡的 *.dll 檔案需移至 ‘Win32Form’ 專案資料夾中
d. 打開屬性頁
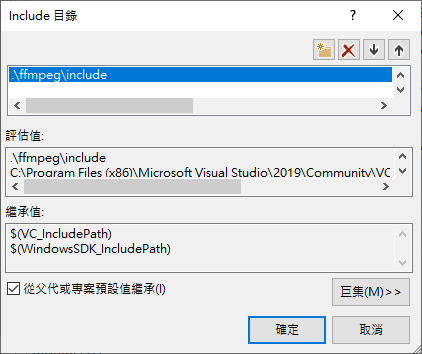
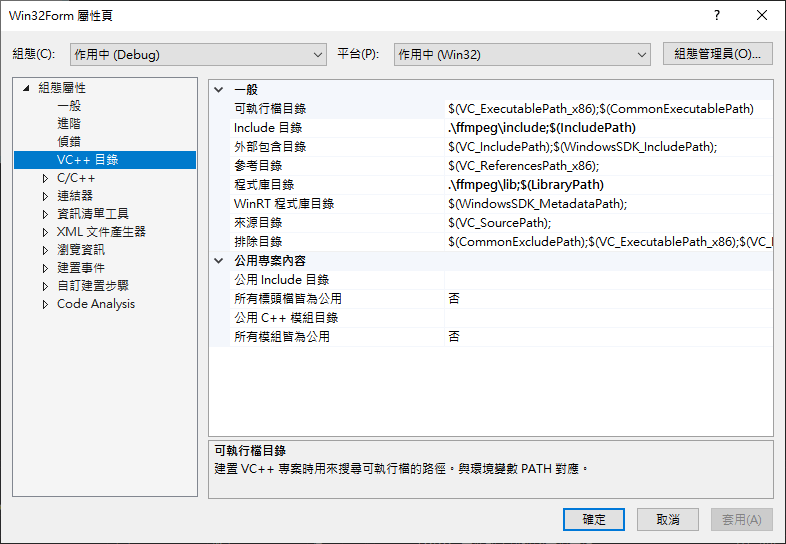
這邊要設定 include、library 路徑。我是設定相對路徑,這樣就算移動整個專案也不用擔心路徑問題。
-
設定include
-
設定library

-
設定結果確認
到此即可編譯 ffmpeg 的檔案了,接下來快速介紹程式碼吧!
程式碼說明 (僅秀出部分程式碼)
我主要是參考這篇文章去做修改,這裡面有更詳細的內容,像是硬體解碼之類,有興趣可以看看。
以下解說我都只取部分程式來解釋,建議搭配原始程式碼去看。
Source.h
- 引入 ffmpeg
由於是 C Code,所以要用extern "C" {}才能正確引入。
extern "C" {
#include <libavcodec/avcodec.h>
#pragma comment(lib, "avcodec.lib")

#include <libavformat/avformat.h>
#pragma comment(lib, "avformat.lib")

#include <libavutil/imgutils.h>
#pragma comment(lib, "avutil.lib")

#include <libswscale/swscale.h>
#pragma comment(lib, "swscale.lib")
}- 解碼器參數的 struct
struct DecoderParam
{
    AVFormatContext* fmtCtx;
    AVCodecContext* vcodecCtx;
    int width;
    int height;
    int videoStreamIndex;
};
Source.cpp
這裡就是實現 FFmpeg API 功能呼叫的程式,基本上讀取影片 Frame 就是看這個檔案。
- 初始化設定,並根據應片檔設定對應解碼器
void InitDecoder(const char* filePath, DecoderParam& param) {
    AVFormatContext* fmtCtx = nullptr;
    avformat_open_input(&fmtCtx, filePath, NULL, NULL);
    avformat_find_stream_info(fmtCtx, NULL);

    AVCodecContext* vcodecCtx = nullptr;
    for (int i = 0; i < fmtCtx->nb_streams; i++) {
        const AVCodec* codec = avcodec_find_decoder(fmtCtx->streams[i]->codecpar->codec_id);
        if (codec->type == AVMEDIA_TYPE_VIDEO) {
            param.videoStreamIndex = i;
            vcodecCtx = avcodec_alloc_context3(codec);
            avcodec_parameters_to_context(vcodecCtx, fmtCtx->streams[i]->codecpar);
            avcodec_open2(vcodecCtx, codec, NULL);
        }
    }

    param.fmtCtx = fmtCtx;
    param.vcodecCtx = vcodecCtx;
    param.width = vcodecCtx->width;
    param.height = vcodecCtx->height;
}- 對影片解碼,並取出 Frame 畫面
av_packet_alloc 分配記憶體存放解碼用的資料。
av_frame_alloc 分配記憶體存放 Frame。
avcodec_receive_frame 取得 Frame 資料。
av_frame_unref、avcodec_close、av_packet_unref 都是釋放記憶體。
AVPacket* packet;
AVFrame* RequestFrame(DecoderParam& param) {
    auto& fmtCtx = param.fmtCtx;
    auto& vcodecCtx = param.vcodecCtx;
    auto& videoStreamIndex = param.videoStreamIndex;

    while (1) {
        packet = av_packet_alloc();
        int ret = av_read_frame(fmtCtx, packet);
        if (ret == 0 && packet->stream_index == videoStreamIndex) {
            ret = avcodec_send_packet(vcodecCtx, packet);
            if (ret == 0) {
                AVFrame* frame = av_frame_alloc();
                ret = avcodec_receive_frame(vcodecCtx, frame);
                if (ret == 0) {
                    av_packet_unref(packet);
                    return frame;
                }
                else if (ret == AVERROR(EAGAIN)) {
                    av_frame_unref(frame);
                }
            }
            set_video_status = 1;
        }
        else {
            set_video_status = 0;
            avcodec_close(vcodecCtx);  // Release decoder
        }

        av_packet_unref(packet);
        return nullptr;
    }
}- 轉換顏色的格式 – YUV轉RGB
我測試的檔案編碼分別是 H.264、Motion-JPEG,所以如果直接取用 frame->data 不會是正確的顏色 (頂多顯示成灰階),所以用 sws_scale 可以轉換顏色。
sws_getCachedContext 設定來源、目標格式大小給後面的 sws_scale 使用。
sws_scale 轉換 Frame 資料,除了顏色之外還有其他功能,有興趣可以去查查。
sws_freeContext 釋放 SwsContext 記憶體。
av_image_fill_arrays 其實就是開新的 Frame Array 存放 sws_scale 轉換過的資料。
void GetRGBPixels(AVFrame* src_frame, AVFrame* dst_frame, uint8_t* buf) {
    SwsContext* swsctx = nullptr;
    swsctx = sws_getCachedContext(
        swsctx,
        src_frame->width, src_frame->height, AVPixelFormat::AV_PIX_FMT_YUV420P,
        src_frame->width, src_frame->height, AVPixelFormat::AV_PIX_FMT_RGB24, NULL, NULL, NULL, NULL
    );

    av_image_fill_arrays(
        dst_frame->data, dst_frame->linesize, buf,
        AV_PIX_FMT_RGB24, src_frame->width, src_frame->height,
        1
    );

    sws_scale(
        swsctx,
        src_frame->data, src_frame->linesize, 0, src_frame->height,
        dst_frame->data, dst_frame->linesize
    );

    sws_freeContext(swsctx);
}
MyForm.h
這邊是將讀取到的 Frame 轉成 UI 顯示的程式,在 C++/CLI CLR WinForm 中,顯示影像的元件叫做 PictureBox,有寫過 C# 應該不陌生,畢竟都是呼叫 .NET 的東西。
- 引入標頭檔、設置
DecoderParam全域變數
#include <msclr/marshal.h>
#include "Source.h"

DecoderParam decoderParam;- 設定 UI 繪圖的相關變數
    public:
        Bitmap^ vo_bmp1;
        Graphics^ vo_gra1;
        Pen^ vo_pen1;
        SolidBrush^ vo_brush;
int encode_mode = 0; // 0:h264(mp4) 1:mjpeg- 使用計時器來讀取每個 Frame 並繪製 UI 顯示
這邊比較長,所以相關說明直接寫在裡面,我的原始程式應該是沒這些註解www。
    private: System::Void timer1_Tick(System::Object^ sender, System::EventArgs^ e) {
        //// packet 宣告在 Source.cpp 中,在這邊引入是為了可以釋放記憶體
        extern AVPacket* packet;

        //// 宣告變數來存放 Frame 資料
        int width, height, bufSize;
        uint8_t* buf; AVFrame* frameOld; AVFrame* frameNew;

        //// 用來取得 Frame (Source.cpp),此時顏色格式還不是 RGB
        //// 因此變數名稱才會命名成 frameOld
        frameOld = RequestFrame(decoderParam);

        //// 有 Frame 進來才會執行 UI 繪圖
        //// 如果讀到空指針 nullptr,則會繼續 RequestFrame
        if (frameOld != nullptr) {
            width = frameOld->width;
            height = frameOld->height;

            //// 初始化 `pictureBox->Image` 的記憶體
            //// 設定 WinForm 視窗大小、pictureBox 元件大小、初始色
            if (this->pictureBox1->Image == nullptr)
            {
                this->Width = this->Width + (width - this->panel1->Width);
                this->Height = this->Height + (height - this->pictureBox1->Height);
                this->pictureBox1->Width = width;
                this->pictureBox1->Height = height;
                vo_bmp1 = gcnew Bitmap(width, height);
                vo_gra1 = Graphics::FromImage(vo_bmp1);
                vo_gra1->Clear(Color::Black);
                this->pictureBox1->Image = vo_bmp1;
            }

            //// 轉換 frameOld 的顏色 (YUV -> RGB)
            //// 分配記憶體空間給 frameNew 來存放 RGB 像素
            bufSize = av_image_get_buffer_size(AV_PIX_FMT_RGB24, width, height, 1 );
            buf = (uint8_t*)av_malloc(bufSize);
            frameNew = av_frame_alloc();
            GetRGBPixels(frameOld, frameNew, buf);

            ////---------------------------------------------------------------------------------
            //// 以下開始填 pictureBox 的資料
            //// 這邊使用 LockBits 來提高繪製效能 (比 setPixel 還要快很多)
            ////---------------------------------------------------------------------------------
            //// 鎖定 Bitmap 記憶體
            System::Drawing::Rectangle rect = System::Drawing::Rectangle(0, 0, vo_bmp1->Width, vo_bmp1->Height);
            System::Drawing::Imaging::BitmapData^ bmpData = vo_bmp1->LockBits(rect, System::Drawing::Imaging::ImageLockMode::ReadWrite, vo_bmp1->PixelFormat);

            //// 設定 Bitmap 指標
            IntPtr ptr = bmpData->Scan0;

            //// 宣告 Array 來存放像素資料,名稱為 destination
            //// 然後使用迴圈去設定 RGB 的像素資料,我習慣用兩個迴圈去填了
            int bytes = bmpData->Stride * vo_bmp1->Height;
            array<byte>^ destination = gcnew array<byte>(bytes);
            System::Runtime::InteropServices::Marshal::Copy(ptr, destination, 0, bytes);
            int nOffset = bmpData->Stride - bmpData->Width * 4;  //通道位移,正常為BGRA。確保後面loc獲得正確像素位置
            //// width、height 是指 pictureBox 的大小
            int pb = 0; int pg = 0; int pr = 0; int loc = 0; int off = 0;
            for (int j = 0; j < height; j++) {
                for (int i = 0; i < width; i++) {
                    //// 取得 frameNew 的 RGB 資料
                    //// frameNew->linesize[0] 表示一行大小,這樣才可以正確讀取下一行資料
                    //// i 會乘 3 是因為位移 RGB 3 bytes
                    loc = i * 3 + j * frameNew->linesize[0];
                    pr = frameNew->data[0][loc];
                    pg = frameNew->data[0][loc + 1];
                    pb = frameNew->data[0][loc + 2];

                    //// 設定 destination 的 RGB資料
                    //// 這邊使用 ARGB,就是包含透明度 Alpha,所以其實位移 4 bytes
                    //// 所以一行的長度是 width * 4
                    loc = (i + j * width) * 4 + off;
                    destination[loc + 0] = pb;
                    destination[loc + 1] = pg;
                    destination[loc + 2] = pr;
                    destination[loc + 3] = 0xff;
                }
                off += nOffset;
            }

            //// 把 destination 的資料填回 bmpData
            //// 解除鎖定 Bitmap 記憶體
            //// 將 Bitmap 設定到 pictureBox->Image,並刷新畫面
            //// 最後將 destination 清除掉
            System::Runtime::InteropServices::Marshal::Copy(destination, 0, ptr, bytes);
            vo_bmp1->UnlockBits(bmpData);
            this->pictureBox1->Image = vo_bmp1;
            this->pictureBox1->Refresh();
            destination->Clear;

            //// 後面都是釋放 FFmpag 所使用的記憶體
            av_frame_free(&frameNew);
            av_free(buf);
        }
        av_frame_free(&frameOld);
        av_packet_free(&packet);
}- 這是設定開始按鍵,主要是選擇檔案並呼叫
InitDecoder來配置解碼器資訊。
(註:之後應該會 print 更多東西出來,目前先印出大小。)
    private: System::Void button_play_Click(System::Object^ sender, System::EventArgs^ e) {
        if (set_video_status == 0) {
            if (this->radioButton_file_1->Checked) {
                encode_mode = 0;
                InitDecoder("..\\test_video.h264.mp4", decoderParam);
            }
            if (this->radioButton_file_2->Checked) {
                encode_mode = 1;
                InitDecoder("..\\test_video.mjpeg.avi", decoderParam);
            }
            auto& width = decoderParam.width;
            auto& height = decoderParam.height;
            //auto& fmtCtx = decoderParam.fmtCtx;
            //auto& vcodecCtx = decoderParam.vcodecCtx;

            printf("Width:  %d\n", width);
            printf("Height: %d\n", height);
            printf("\n");

            this->timer1->Enabled = true;
        }
    }
MyForm.cpp
- 新增主函式 main(),這個就是對應剛剛在屬性頁設定的進入點。
#include "MyForm.h"

using namespace System;
using namespace System::Windows::Forms;
[STAThreadAttribute]
void main(array<String^>^ args) {
    Application::EnableVisualStyles();
    Application::SetCompatibleTextRenderingDefault(false);
    Win32Form::MyForm form;  // MyProject 需根據專案名稱進行替換
    Application::Run(% form);
}
程式運行結果
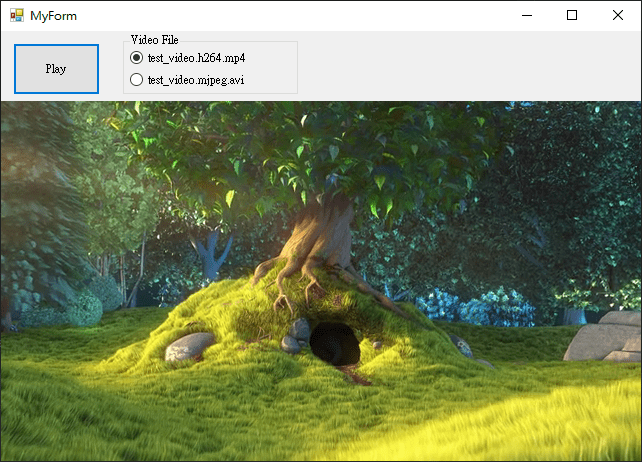
程式碼:Github 連結,檔案沒啥篩選就都放進去惹,而且也包含測試影片,所以有點大,如果 Visual Studio 有把 CLR 安裝好,理論上應該可以直接跑…
結語
這次應該久違寫這麼詳細的文章,我打字太慢寫一篇文章都很久…,但如果要把平常筆記、工作內容整理起來,對我來說還是寫成文章比較有系統,同時也會重新思考是如何實作,有很多東西自己整理過後分享出來,我覺得才算是真正完成一個功能,即便是小小的功能都是自己的一個大進步XD。
之後會不會增加功能我還不知道,但是可以肯定的是下面參考資料幫了我很多,各位一定要看看。
(參考資料其實只有看第一個的前半段,後面實在太難,我看不懂了QAQ,但是這位大神分享的實在太牛B了。而且只看前半段就讓我完成簡易影片撥放功能,這還不好好寫筆記,怎麼可以呢?各位說對不對壓XDD)
假設要加功能,估計是音訊、影片控制而已,其他畫面速度處理優化,硬體解碼巴拉巴拉的估計是無法了。
1,375 則留言
Vegtech
Your mode of describing all in this post is truly pleasant, every one can without difficulty know it, Thanks a lot https://vegtech.ca/produit/egreneuse-d-ail/
Josephmog
lyrica da 25 mg prezzo: farmacia online messina – cacit vitamina d3 bustine
MichaelNeolo
vaccin tГ©tanos pharmacie sans ordonnance: Pharmacie Express – test covid sans ordonnance pharmacie
BradleyDit
farmacia online con receta Confia Pharma curso tecnico em farmacia online
BradleyDit
se puede comprar testosterona en la farmacia sin receta farmacia svizzera internazionale online se puede comprar zithromax sin receta