Python:常用的 OpenCV 指令
這裡簡單記錄自己在 Python 中常用的 OpenCV 指令。
Reading Image
利用 imread() 進行影像讀取。Opencv 讀圖都是採 BGR 格式。
src = "image.png"        # 圖片的路徑
dst = cv2.imread(src)     # bgr   (3 channel)
dst = cv2.imread(src, 0)  # gray  (1 channel)
Showing Image
使用 imshow() 顯示影像。通常會配合 waitKey(0) 及 destroyAllWindows() 使用。
waitKey(0):等待使用者按下按鍵。此時程式會在這裡等待,不做任何動作。destroyAllWindows():關閉所有 OpenCV 的視窗。
img = cv2.imread("image.png")
cv2.imshow("frame", img)
cv2.waitKey(0)
cv2.destroyAllWindows()
Resizing Image
縮放圖片處理。
dst = cv2.resize(src, dsize, fx, fy, interpolation)
參數說明:
src: 輸入影像。
dsize: 輸出影像大小。
fx、fy:縮放因子 (我通常不會去設)。
interpolation: 插值方式 (我通常不會去設)。
- INTER_NEAREST:最近鄰插值。
- INTER_LINEAR:雙線性插值(預設)。
- INTER_CUBIC:雙三次插值。
- INTER_AREA:藉由 pixel 之間的關係重新進行採樣。
- INTER_LANCZOS4:在 8×8 鄰域上進行 Lanczos 插值。
插值的其他參數可以參考 OpenCV: Geometric Image Transformations
Image Flip
翻轉影像。能夠設定水平翻轉、垂直翻轉、同時水平及垂直翻轉。
flipped_vertically   = cv2.flip(image, 0)   # 圍繞 X軸 翻轉,垂直翻轉
flipped_horizontally = cv2.flip(image, 1)   # 圍繞 Y軸 翻轉,水平翻轉
flipped_ver_and_hor  = cv2.flip(image, -1)  # 同時垂直與水平翻轉
Affine Transformation
仿射轉換是指影像透過一系列的幾何轉換之後,實現影像平移、旋轉等等。轉換完的影像會保持平直性及平移性。平直性代表直線依然是直線;平行性代表平行線依然是平行線。
dst = cv2.warpAffine(src, M, dsize, flags, borderMode, borderValue)
| 參數 | 說明 |
|---|---|
| src | 輸入影像 |
| M | 代表一個 2×3 的 Affine 矩陣 |
| dsize | 輸出影像的大小 |
| flags | 內插類型,預設是 INTER_LINEAR |
| borderMode | 邊緣類型,預設是 BORDER_CONSTANT |
| borderValue | 邊界值,預設是 0 |
幾何變換操作如圖所示
下圖秀出各種幾何變換,也間接解釋為何使用 2×3 矩陣來定義轉換矩陣 M。
圖片來源取自 2D affine transformation matrix – Affine transformation – Wikipedia
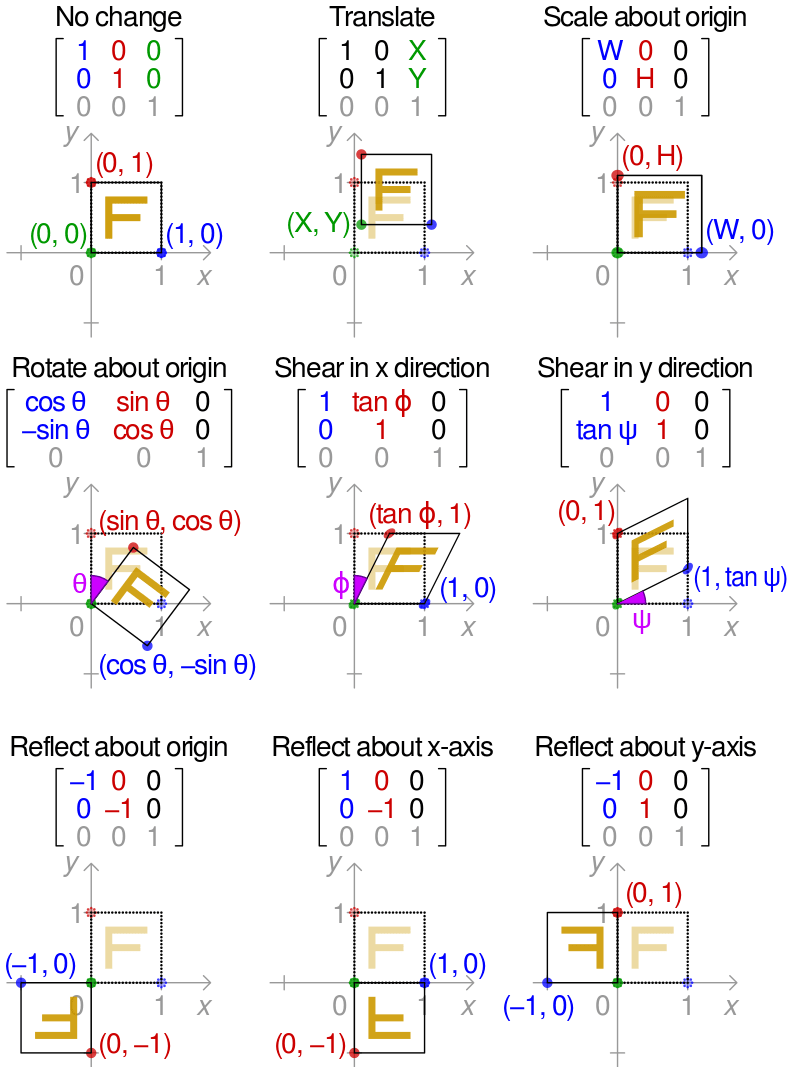
Image Translation
平移影像。
import cv2
import numpy as np
import matplotlib.pyplot as plt

# 定義一個平移函數
def translate(image, x, y):
    height, width = image.shape[:2]  # 取得影像長、寬
    M = np.float32([[1, 0, x], [0, 1, y]])  # 定義轉換矩陣 M
    shifted = cv2.warpAffine(image, M, (width, height))  # 實現仿射轉換
    return shifted  # 回傳轉換結果

img = cv2.imread("lena.bmp", 0)  # 讀取影像
new = translate(img, 100, 200)   # 進行平移

# 顯示原始影像、轉換結果
plt.imshow(img),plt.show()
plt.imshow(new),plt.show()
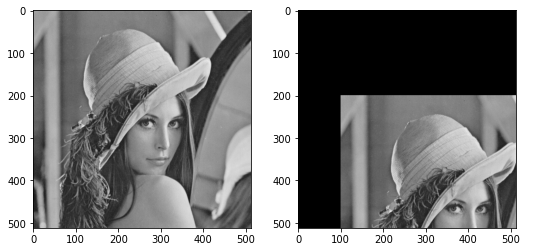
Rotate Image
旋轉圖像。
import cv2
import numpy as np
import matplotlib.pyplot as plt

# 定義旋轉函數
def rotate(image, angle, scale=1.0):
    height, width = image.shape[:2]  # 取得影像長、寬
    center = (width/2, height/2)     # 設定影像中心位置
    # 旋轉影像
    M = cv2.getRotationMatrix2D(center, angle, scale)
    rotated = cv2.warpAffine(image, M, (width, height))
    return rotated # 回傳轉換結果

img = cv2.imread("lena.bmp", 0)  # 讀取影像
new = rotate(img, 45)  # 進行平移

# 顯示原始影像、轉換結果
plt.imshow(img),plt.show()
plt.imshow(new),plt.show()
Color Space Conversions
dst = cv2.cvtColor(img, cv2.COLOR_XXX2XXX)
我常用的是
- 色彩、灰階 互轉
- COLOR_BGR2GRAY
- COLOR_RGB2GRAY
- COLOR_GRAY2BGR
- COLOR_GRAY2RGB
- HSV 空間
- COLOR_BGR2HSV
- COLOR_RGB2HSV
- COLOR_HSV2BGR
- COLOR_HSV2RGB
cv2.COLOR_XXX2XXX 相關轉換參數可參考 OpenCV: Color Space Conversions。
Image Thresholding
這裡直接用官方的範例 — OpenCV: Image Thresholding 來說明:
dst = cv2.threshold(src, thresh, maxval, thresholding_type)
本身提供五種類型的取閥值方式
官方範例:
# 引入必要模組
import cv2
import numpy as np
from matplotlib import pyplot as plt

# 讀取漸變圖
img = cv2.imread('gradient.png', 0)

# 各種閥值函數
ret,thresh1 = cv2.threshold(img, 127, 255, cv2.THRESH_BINARY)
ret,thresh2 = cv2.threshold(img, 127, 255, cv2.THRESH_BINARY_INV)
ret,thresh3 = cv2.threshold(img, 127, 255, cv2.THRESH_TRUNC)
ret,thresh4 = cv2.threshold(img, 127, 255, cv2.THRESH_TOZERO)
ret,thresh5 = cv2.threshold(img, 127, 255, cv2.THRESH_TOZERO_INV)

# 顯示取閥值的結果
titles = ["Original Image", "BINARY", "BINARY_INV", "TRUNC", "TOZERO", "TOZERO_INV"]
images = [img, thresh1, thresh2, thresh3, thresh4, thresh5]
for i in range(6):
    plt.subplot(2, 3, i+1)
    plt.imshow(images[i], "gray", vmin=0, vmax=255)
    plt.title(titles[i])
    plt.xticks([])
    plt.yticks([])
plt.show()
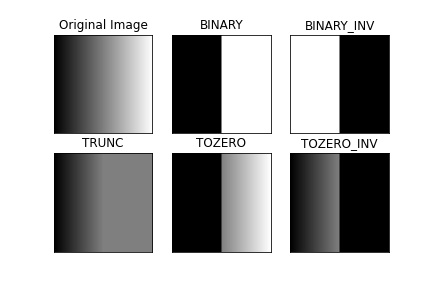
圖片來源取自 OpenCV: Image Thresholding。
除了上面 Simple Thresholding 之外,還有 Adaptive Thresholding 及 Otsu’s thresholding 的方式。
Video Capturing
能夠擷取影片檔、攝影機的類別。通常會與 waitKey() 搭配使用。
Example
建構一個小型攝影機程式
- 使用
VideoCapture()可以建立一個影像擷取物件,這裡我們希望取出攝影機的影像,所以將這個物件命名為camera。 - 使用
read()來獲得新的影像,並用imshow()來顯示影像。 - 由於
camera會不斷的拍攝新的影像,所以要用while迴圈來跑read()跟imshow()。 - 利用
waitKey(1)來偵測按鍵。當按下'q'時,就會跳出while迴圈。 - 最後要關閉程式前,要先用
release()來釋放camera,並用destroyAllWindows()關閉視窗。
import cv2  # 引入 OpenCV

camera = cv2.VideoCapture(0, cv2.CAP_DSHOW)  # 選擇攝影機

while True:
    ret, frame = camera.read()  # 從 Camera 中擷取影像
    cv2.imshow("frame", frame)  # 顯示影像
    # 若按下 q 鍵則離開迴圈
    if cv2.waitKey(1) & 0xFF == ord("q"):
        break

camera.release()         # 釋放攝影機
cv2.destroyAllWindows()  # 關閉視窗
Note:如果要讀影片檔,直接在 VideoCapture() 的地方,輸入影片路徑即可。
cap = cv2.VideoCapture("video.mp4")
2,137 則留言
MichaelNeolo
a derma lait corps: Pharmacie Express – dexeryl demangeaison
Josephmog
comprar medicamentos sin receta en portugal: chat farmacia online – comprar cremas farmacia online
MichaelNeolo
viagra tarif: caudalie masque hydratant – sildГ©nafil prix
BradleyDit
doc peter farmacia online puedo comprar cialis sin receta farmacia online la sagrera
BradleyDit
se puede comprar antibiГіticos sin receta? Confia Pharma la viagra se puede comprar sin receta?