Python:常用的 OpenCV 指令
這裡簡單記錄自己在 Python 中常用的 OpenCV 指令。
Reading Image
利用 imread() 進行影像讀取。Opencv 讀圖都是採 BGR 格式。
src = "image.png"        # 圖片的路徑
dst = cv2.imread(src)     # bgr   (3 channel)
dst = cv2.imread(src, 0)  # gray  (1 channel)
Showing Image
使用 imshow() 顯示影像。通常會配合 waitKey(0) 及 destroyAllWindows() 使用。
waitKey(0):等待使用者按下按鍵。此時程式會在這裡等待,不做任何動作。destroyAllWindows():關閉所有 OpenCV 的視窗。
img = cv2.imread("image.png")
cv2.imshow("frame", img)
cv2.waitKey(0)
cv2.destroyAllWindows()
Resizing Image
縮放圖片處理。
dst = cv2.resize(src, dsize, fx, fy, interpolation)
參數說明:
src: 輸入影像。
dsize: 輸出影像大小。
fx、fy:縮放因子 (我通常不會去設)。
interpolation: 插值方式 (我通常不會去設)。
- INTER_NEAREST:最近鄰插值。
- INTER_LINEAR:雙線性插值(預設)。
- INTER_CUBIC:雙三次插值。
- INTER_AREA:藉由 pixel 之間的關係重新進行採樣。
- INTER_LANCZOS4:在 8×8 鄰域上進行 Lanczos 插值。
插值的其他參數可以參考 OpenCV: Geometric Image Transformations
Image Flip
翻轉影像。能夠設定水平翻轉、垂直翻轉、同時水平及垂直翻轉。
flipped_vertically   = cv2.flip(image, 0)   # 圍繞 X軸 翻轉,垂直翻轉
flipped_horizontally = cv2.flip(image, 1)   # 圍繞 Y軸 翻轉,水平翻轉
flipped_ver_and_hor  = cv2.flip(image, -1)  # 同時垂直與水平翻轉
Affine Transformation
仿射轉換是指影像透過一系列的幾何轉換之後,實現影像平移、旋轉等等。轉換完的影像會保持平直性及平移性。平直性代表直線依然是直線;平行性代表平行線依然是平行線。
dst = cv2.warpAffine(src, M, dsize, flags, borderMode, borderValue)
| 參數 | 說明 |
|---|---|
| src | 輸入影像 |
| M | 代表一個 2×3 的 Affine 矩陣 |
| dsize | 輸出影像的大小 |
| flags | 內插類型,預設是 INTER_LINEAR |
| borderMode | 邊緣類型,預設是 BORDER_CONSTANT |
| borderValue | 邊界值,預設是 0 |
幾何變換操作如圖所示
下圖秀出各種幾何變換,也間接解釋為何使用 2×3 矩陣來定義轉換矩陣 M。
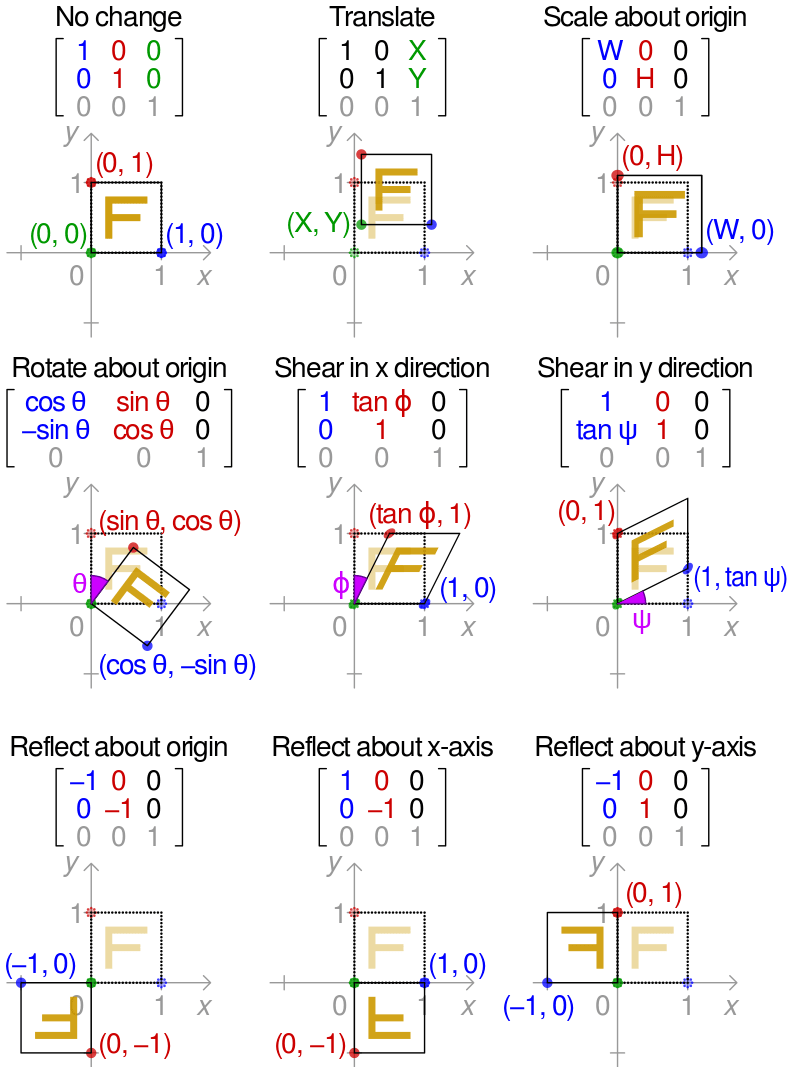
圖片來源取自 2D affine transformation matrix – Affine transformation – Wikipedia
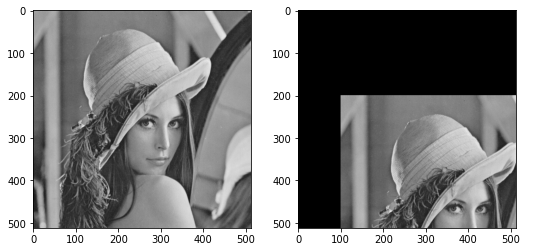
Image Translation
平移影像。
import cv2
import numpy as np
import matplotlib.pyplot as plt

# 定義一個平移函數
def translate(image, x, y):
    height, width = image.shape[:2]  # 取得影像長、寬
    M = np.float32([[1, 0, x], [0, 1, y]])  # 定義轉換矩陣 M
    shifted = cv2.warpAffine(image, M, (width, height))  # 實現仿射轉換
    return shifted  # 回傳轉換結果

img = cv2.imread("lena.bmp", 0)  # 讀取影像
new = translate(img, 100, 200)   # 進行平移

# 顯示原始影像、轉換結果
plt.imshow(img),plt.show()
plt.imshow(new),plt.show()
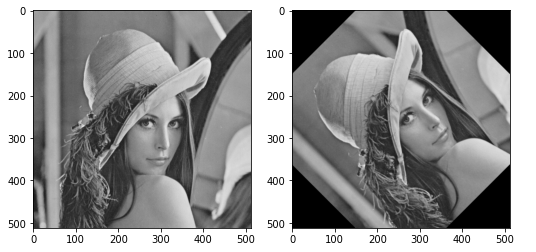
Rotate Image
旋轉圖像。
import cv2
import numpy as np
import matplotlib.pyplot as plt

# 定義旋轉函數
def rotate(image, angle, scale=1.0):
    height, width = image.shape[:2]  # 取得影像長、寬
    center = (width/2, height/2)     # 設定影像中心位置
    # 旋轉影像
    M = cv2.getRotationMatrix2D(center, angle, scale)
    rotated = cv2.warpAffine(image, M, (width, height))
    return rotated # 回傳轉換結果

img = cv2.imread("lena.bmp", 0)  # 讀取影像
new = rotate(img, 45)  # 進行平移

# 顯示原始影像、轉換結果
plt.imshow(img),plt.show()
plt.imshow(new),plt.show()
Color Space Conversions
dst = cv2.cvtColor(img, cv2.COLOR_XXX2XXX)
我常用的是
- 色彩、灰階 互轉
- COLOR_BGR2GRAY
- COLOR_RGB2GRAY
- COLOR_GRAY2BGR
- COLOR_GRAY2RGB
- HSV 空間
- COLOR_BGR2HSV
- COLOR_RGB2HSV
- COLOR_HSV2BGR
- COLOR_HSV2RGB
cv2.COLOR_XXX2XXX 相關轉換參數可參考 OpenCV: Color Space Conversions。
Image Thresholding
這裡直接用官方的範例 — OpenCV: Image Thresholding 來說明:
dst = cv2.threshold(src, thresh, maxval, thresholding_type)
本身提供五種類型的取閥值方式
官方範例:
# 引入必要模組
import cv2
import numpy as np
from matplotlib import pyplot as plt

# 讀取漸變圖
img = cv2.imread('gradient.png', 0)

# 各種閥值函數
ret,thresh1 = cv2.threshold(img, 127, 255, cv2.THRESH_BINARY)
ret,thresh2 = cv2.threshold(img, 127, 255, cv2.THRESH_BINARY_INV)
ret,thresh3 = cv2.threshold(img, 127, 255, cv2.THRESH_TRUNC)
ret,thresh4 = cv2.threshold(img, 127, 255, cv2.THRESH_TOZERO)
ret,thresh5 = cv2.threshold(img, 127, 255, cv2.THRESH_TOZERO_INV)

# 顯示取閥值的結果
titles = ["Original Image", "BINARY", "BINARY_INV", "TRUNC", "TOZERO", "TOZERO_INV"]
images = [img, thresh1, thresh2, thresh3, thresh4, thresh5]
for i in range(6):
    plt.subplot(2, 3, i+1)
    plt.imshow(images[i], "gray", vmin=0, vmax=255)
    plt.title(titles[i])
    plt.xticks([])
    plt.yticks([])
plt.show()
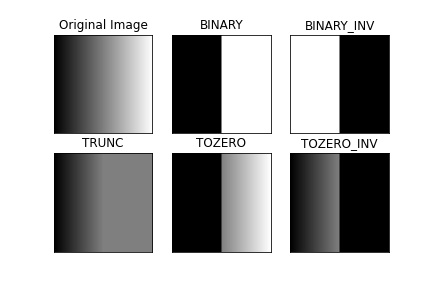
圖片來源取自 OpenCV: Image Thresholding。
除了上面 Simple Thresholding 之外,還有 Adaptive Thresholding 及 Otsu’s thresholding 的方式。
Video Capturing
能夠擷取影片檔、攝影機的類別。通常會與 waitKey() 搭配使用。
Example
建構一個小型攝影機程式
- 使用
VideoCapture()可以建立一個影像擷取物件,這裡我們希望取出攝影機的影像,所以將這個物件命名為camera。 - 使用
read()來獲得新的影像,並用imshow()來顯示影像。 - 由於
camera會不斷的拍攝新的影像,所以要用while迴圈來跑read()跟imshow()。 - 利用
waitKey(1)來偵測按鍵。當按下'q'時,就會跳出while迴圈。 - 最後要關閉程式前,要先用
release()來釋放camera,並用destroyAllWindows()關閉視窗。
import cv2  # 引入 OpenCV

camera = cv2.VideoCapture(0, cv2.CAP_DSHOW)  # 選擇攝影機

while True:
    ret, frame = camera.read()  # 從 Camera 中擷取影像
    cv2.imshow("frame", frame)  # 顯示影像
    # 若按下 q 鍵則離開迴圈
    if cv2.waitKey(1) & 0xFF == ord("q"):
        break

camera.release()         # 釋放攝影機
cv2.destroyAllWindows()  # 關閉視窗
Note:如果要讀影片檔,直接在 VideoCapture() 的地方,輸入影片路徑即可。
cap = cv2.VideoCapture("video.mp4")